Drawer 3D Tool
Drawer 3D Tool
To use a drawer in a box of the cabinet, select the drawer front in the cabinet maker first. Then open the Drawer 3D tool in the interiorcad tool set and click on the front. In the Tool bar you can adjust the Top and Bottom additions in the tool's settings. As an alternative to the top and bottom additions, the position of a drawer can be changed in the y and z directions with the Vectorworks tools (Object Info palette, moving and Ctrl + M).

you have the choice of System Drawers and Wooden Drawers. All matching Drawer / Slider combinations for the highlighted box are shown.

Make the appropriate selection, and confirm with the green tick. The drawer will automatically be adapted and inserted.
To create an individual drawer, select "Configure System Drawer" or "Configure Wooden drawer".


This configuration is stored in the library file „Drawers - Custom“. You can then reuse this configuration in the pop-up menu in the method bar of the „Drawer 3D“ tool and in the drawer configuration dialog.
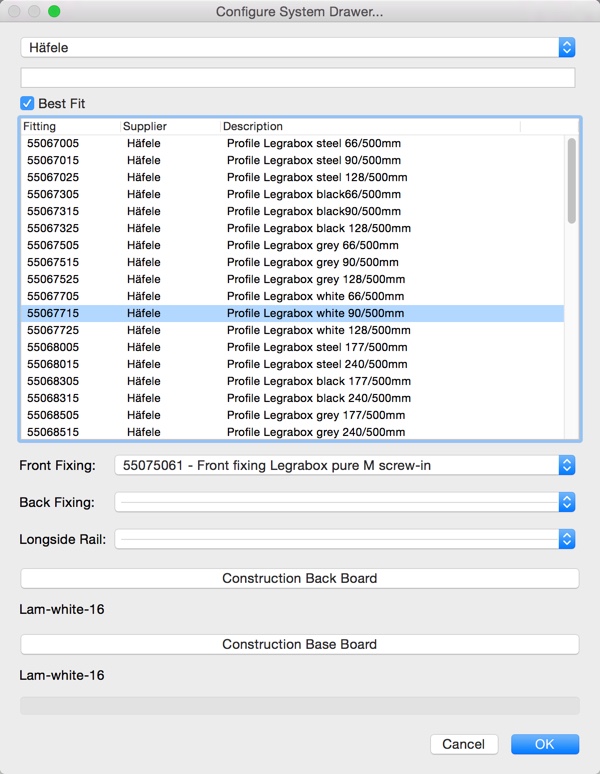
In the System Drawer configuration dialog select the Profile, the Front and Back Fixing and the Longside Rail. The profiles can be sorted by manufacturer and searched in full text. By enabling the "Best Fit" option only the longest fitting drawer profiles will be shown. By pressing the "Construction Back Board" or "Construction Base Board" button you can assign materials. The configured drawer is activated automatically.
Wooden Drawers can be tailored to suit. For example, drawers can created without Fronts or with the Cabinet Front replacing the conventional front. It is also possible to change materials preferences and set the parameters for any dado/rabbet. To insert drawers with the Cabinet Front as the front piece, select "Drawer (no laid on front)" on the Division Tab in the Cabinet Maker.
If you select the „opening“ design type for the front panel, the drawer front panel is moved to the rear by the thickness of the drawer front panel. The drawer is lengthened accordingly. You can add a „left“/ „right“/ „top“/ „bottom“ overhang to an „opening“ front piece to cover the drawer.
The overhang is automatically configured when inserting the drawer into a 3D carcass unit - based on the „air“ values set for the drawer.

When you activate «Bought In Draw», the items no longer appear in the parts lists.
When you enter the order information, a list of Bought In Draws and their properties are produced instead (Liste «XGZU-Wooden Drawer» in the default «interiorcad.sta», You can use these place holders for your own lists: ([BoughtInName], [BoughtInDescription], [BoughtInAmount], [BoughtInWidth], [BoughtInDepth], [BoughtInHeight], [BoughtInSupplierID], [BoughtInSupplier], [BoughtInFitting], [BoughtInWoodenDrawerSidesMaterial], [BoughtInWoodenDrawerSidesThickness],
[BoughtInWoodenDrawerBaseMaterial], [BoughtInWoodenDrawerBaseThickness], [BoughtInWoodenDrawerFrontHeight], [BoughtInWoodenDrawerSideHeight], [BoughtInWoodenDrawerFrontImplementation], [BoughtInWoodenDrawerBackImplementation], [BoughtInWoodenDrawerSidesImplementation]).
Another tip: If you need drawers frequently, you should create them with the Drawer Creator 3D 