NC Macro 3D
With the NC Macro 3D 
We distinguish between:
External macros are little programs written in their CNC software, which can be accessed by name and their variables within interiorcad
Internal macros are functions in their CNC Software. They are accessed by the macro number or name and the individual parameter. Depending on the WOP you can extract the macro number and the available parameter names within the help file or the interface description
Different to every other function in interiorcad, the use of NC macros is machine specific. If you like to use the NC output on a different machine, you need to adjust the NC macros accordingly. Therefore the use is only thought of as a feature extension.
An application example is an already programed macro for Lamello Clamex fittings, which is offered by most WOP Software developers. You would use these as described following:
Open the tool NC Macro 3D from the interiorcad tool set
Use one click to place the macro at the relevant component where the macro shall be used
Adjust the macro within the “Info” palette

Name is the macro name in your WOP software. The writing format varies depending on your WOP-Software. While IMAWOP accepts the writing format used in the illustration, you have to add the file ending .mpr at you WoodWOP input.
Delta X, Delta Y and the depth are the dimensions the macro will be executed on.
Using “Rotation” you determine a rotation.
When you execute an internal macro or transfer additional variables, these will be transferred via an interiorcad database. Following an example for a rectangular pocket in WoodWOP:
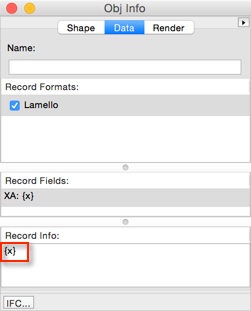
- Click right within the Ressource Browser and create a new Record format:

- Name the database identical with the macro, which you will allocate later within the “Info” palette. For example the rectangular pocket will have these fields in WoodWOP. The field configuration originates from the WoodWOP interface description (mpr4x_Formatbeschreibung.pdf).

- The first field name is the macro number.You can manipulate the fields with individual values either by using the “Info” palette or by accessing the positioning etc. directly within the macro.
- {x} – Position x in the drawing
- {z} – Position y
- {z} – Position z
- {deltax} – Delta X from the “Info” palette (length)
- {deltay} – Delta Y from the “Info” palette (width)
- {depth} – Depth
- {thickness} – Thickness of connected 3D component
- {cangle} – Macro rotation in drawing around z-axis
- {aangle} – Macro rotation in drawing around x-axis
- Also calculations, which are supported by the WOP software like {deltax}/2 are possible.
- A NC macro will be included after the database creation.
- On the “Data” tab in the “Info” palette you can now allocate a database and overwrite the default values as desired.
- Values of the database will be used for the NC code creation.